Let's start with the phone alerts I mentioned. I'll describe that one in detail. I have learned that the FitBit Aria will alert you to phone AND text messages, but the Charge HR currently only does calls. This is a little silly, and clearly just a move by FitBit to promote the sale of different models. While I'm not a fan of that kind of tactic, it is the world we live in. So, if you have the HR, here's how to turn on those helpful phone call alerts.
 |
| Turn On Phone Call Alerts On Your FitBit Charge HR! |
From the main screen of the FitBit iOS App:
- TAP on the device (Charge HR)
- TAP on NOTIFICATIONS
- TAP on the TOGGLE to turn on notifications
Sounds easy, but I had a hard time locating it. Hope you find it helpful!
The other killer feature I found is the ability to map my walks, which includes the ability to control music on my phone from the FitBit!
From the main screen of the FitBit iOS App:
 |
| Map Your Walks/Runs: First Turn On Location Tracking! |
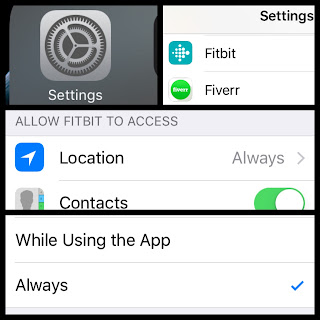
- First make sure you have location tracking on in settings.
- From the home screen of your iPhone, TAP on your Apple Settings (Gear icon)
- TAP on FitBit
- TAP on LOCATION
- TAP on whichever option you want (presumably ALWAYS)
- Be aware this will use more battery power due to the GPS usage!
 | |
|
- TAP the HOME button on your iPhone
- TAP on the FitBit app icon
- TAP on TRACK EXERCISE
- TAP on the STOPWATCH icon in the top right corner
- And TAP the START button! From that screen you can also control the ability to control your music. This is a pretty cool feature, and allows you to delete one more app you don't need from your phone!
Another really valuable thing is to get the settings all correct. Take some time, and review all your settings in the FitBit app. Pay particular attention to the dominant arm or non-dominant arm. Make sure your FitBit is set to the correct arm you are wearing it on. This is how it knows to estimate your stride. While this works pretty well, based on these settings and your height and age, etc, it's still very much an estimate. A good thing to do is to take your wearable to the track. One where you know the exact length, such as a football field track that you know has a set distance. Literally walk the exact distance and COUNT your steps manually. When you are done, divide the total distance by your number of steps. This gives you your stride length. Once you have this figure, go to the FitBit Website - www.FitBit.com - and login. Once there:
- CLICK on the SETTINGS GEAR in the top right corner
- Then CLICK on PERSONAL INFO from the menu on the left
- SCROLL down to BODY INFO
- ENTER the figure on STRIDE LENGTH
- SCROLL down and hit SAVE
Now your steps will be more accurate. This is more important than you might think because I've checked mine and it's off by a pretty good clip. My wife and I have noticed that our steps vary by quad digits, even though we walk the same distance roughly. I checked last night, twice, and the steps it's counting are less than I'm taking. For example, I counted 500 steps, and it showed 350 or so. I'll be taking this advice on mine very soon!
Lastly, be sure you save battery wherever possible. Some of the items above may drain power more, so a good offset - if you care - is to turn off "ALL DAY SYNC". The FitBit Charge HR will be set to this mode by default, and really you can leave as such if you don't mind charging every couple of days.
I have found that the promised "5 Days" of battery life is not realistic regardless of how you set things up. And definitely syncing takes a toll. At first, I combatted this by turning off bluetooth. This means it only syncs when I turn on bluetooth. This was very easy since you can just swipe up on your iOS screen and toggle Bluetooth from the dashboard.
Once I learned about All Day Sync, I went ahead and turned it off. I just did this, so I'm not yet sure how it will affect things. I'll get back to you on that. Meanwhile, if you'd like to turn off All Day Sync, you can do so by going to the main screen of the FitBit app on your iOS device and:
- TAP on the device at the top of the screen "CHARGE HR"
- TAP on the TOGGLE switch for ALL-DAY SYNC so that it is in the off position.
DONE!
I hope these things will help you get more benefit out of your FitBit, and I hope it results in more health benefits for YOU!

No comments:
Post a Comment